Monday, October 1, 2012

Grilled Pork Chops with Peach Salsa and Caprese Salad Stuffed Tomatoes!

If there is one word to describe this dinner it would be DELICIOUS! Even my husband who the only way I know if he really likes something (because for the most part he will eat whatever I put in front of him) is if he goes for seconds. ACTUALLY said the words "Wow this is really good Babe" **talking about the pork chops with peach salsa** As for the stuffed tomatoes, everyone else loved them...him not so much but he isn't a huge fan of caprese salads in general so I was expecting that comment from him, but he still ate his entire plate! :) 

I was really proud of myself for even trying the pork chop recipe because I have always thought (due to a very traumatic...ok maybe not THAT traumatic but to me as a kid it sure seemed like it) I didn't like Peaches. But ever since my transplant I have been noticing that I like things now that I never liked pre-transplant. 

SO I told myself that I was going to start trying new recipes that I wouldn't normally choose to see if I like whatever food happens to be in it that I don't eat. If I don't like it, ok I won't make that recipe anymore. If I do, well then I just found something I can add to my list of likable foods! 

This was my first dinner with my new venture and boy was it a WINNER and guess what...I LIKE Peaches!! Who knew?? LOL

Ok so here are the recipes for both which I got from good ol' Sandra Lee by watching the Food Network...but don't worry I didn't have Cocktail time OR do a table scape. :) 


Grilled Pork Chops w/Peach Salsa 

Ingredients

Peach salsa:

  • 1/2 red onion, diced (reserve the other half for Online Round 2 Recipe Orzo Soup with Pork)
  • 2 peaches, halved, pitted and diced
  • 1 tablespoon lime juice
  • 1 teaspoon olive oil
  • 1 tablespoon chopped cilantro leaves
  • Pinch kosher salt and freshly ground black pepper

Pork chops:

  • 5 pork chops, end cut
  • 2 tablespoons canola oil
  • 2 tablespoons chili powder
  • 1 tablespoon salt
  • 1 tablespoon freshly ground black pepper

Directions

Salsa:
In a bowl toss all of the salsa ingredients together and set aside.
Pork chops:
Heat an outdoor grill or grill pan over medium-high heat.
Brush the pork chops with the oil. In a small bowl combine the chili powder, salt and pepper. Generously sprinkle the rub over both sides of each pork chop. Grill the chops until cooked through, about 4 to 6 minutes per side. (Set 1 chop aside for Online Round 2 Recipe, Orzo Soup with Pork.) Arrange the chops on a serving platter and let rest 5 minutes before serving.
Serve the chops with the peach salsa.


Caprese Salad Stuffed Tomatoes

Ingredients

  • beefsteak tomatoes
  • 1 (1-pound) block mozzarella
  • 1 (16-ounce) package orzo, cooked according to package instructions
  • 1 tablespoon red wine vinegar
  • 2 tablespoons olive oil
  • 2 tablespoons chopped fresh basil leaves
  • Kosher salt and freshly ground black pepper

Directions

Cut the tops off of 4 tomatoes and with a spoon remove the pulp from the inside, to form a bowl. Dice the pulp and half of the remaining tomato (reserve remaining half for the Round 2 Recipe Grilled Margherita Pizza). Dice the mozzarella to measure 1 cup. (Reserve the rest for the Round 2 Recipe Grilled Margherita Pizza.)
In a bowl, combine 2 cups of the orzo (reserve the rest for the Online Round 2 Recipe Orzo Soup with Pork), diced mozzarella, diced tomato, vinegar, olive oil, basil, and salt and pepper, to taste. Divide the mixture among the 4 tomatoes and serve.

There was A LOT of this orzo left over after stuffing the tomatoes!


SO good...I LOVE tomatoes! 

and here it is ALL put together in its yummy wonderful-ness! :)


As always, let me know if you try this recipe and what you think! I have SEVERAL dinners back logged that I have to type out and post then I have one recipe this week that goes in my "try new things" category so we will see how well that turns out! I can only do one weird recipe a week to try...im not that adventures! 

**watch these two recipes when you go to buy your ingredients because she has you buy more so that you have enough food for what she calls "round two recipes."  If you don't plan on looking those up (she tells you what they are in the directions of each) you can get away with buying less ingredients of some things**

Good Night! Xo

Wednesday, September 12, 2012

Let's Try This One More Time!! Easy Crock Pot Meal...

Well hello. Shall we try this blog thing again?? Every time I (think) am home for good and ready to start cooking again....BAM! Just like that something else happens and I am back in the hospital.

 Last year was AMAZING and I was hardly ever sick and so far this year I have lost count with the amount of times I was admitted to the hospital. If I wasn't admitted I was sick as a dog at home not wanting to cook anything and BARELY wanting to eat anything! Not a good combo I can assure you! 

So I get home on Sunday night with stuff that I have already planned on making once I got home I just needed to go food shopping (I was in the hospital 3 weeks I had A LOT of time to look up recipes!) 

I was REALLY craving some Shepards Pie that my one good friend Amanda was telling me she makes for her son but unfortunately when I went to cook dinner Monday night my feet where the size of watermelons and there was no way I was gonna be able to stand in the kitchen and make dinner so I called the hubby and told him my dilemma. When he got home from work he quickly showered while I made him a list (a very short list he isn't the best grocery shopper when I am not with him!) of things to grab from the store. On that list was Publix Fried Chicken that we could just eat that night without having to cook anything since it was already so late (and Publix fried chicken is to DIE for!) plus I had decided that since my feet swelling was a problem that was worse in the afternoons I planned to do a crock pot meal that I could throw in the pot in the morning while the feet where relatively "normal" size and not very painful and by dinner time when they were gi-normus (yes that is a word) all I had to do was some last minute touches so I wasn't on my feet very long! Am I genius or what? 

Well, let me just say that the meal I picked which I found on the Crockin' Girls Facebook page (it was one of their Crockin' Monday Videos) was I think the easiest crock pot meal I have ever made. You know how sometimes with crock pot meats they make you sear the meat or cook the chicken first or whatever, well you don't have to do that with this recipe which saves a step and another pot you don't have to clean! Also, everything just gets mixed right in the crock pot I seriously had no clean up except what I was throwing away in the trash. Amazing I tell ya..

So here is the recipe for what I put in the Crock and then I will tell you what I made to go along with it! 

Little Meats and Gravy

Ingredients

  • 2 Pounds of chuck or stew beef, cut into 1/2-inch pieces
  • 1 Package of onion soup mix
  • 2 Cans of low sodium cream of chicken soup
  • 2 soup Cans of water
  • 1 Package of cooked noodles, rice or potatoes for serving
**I served ours over rice cause thats what we had!!**

Directions

  1. Step One

    Combine all ingredients into 6 quart slow cooker; stir.
  2. Step Two

    Cover and cook on LOW for 8–12 hours or on HIGH for 5–6 hours. If you've frozen this recipe you can cook it for 10-12 hours on LOW.
  3. Step Three

    Thicken, if desired, and serve over noodles, rice, or potatoes.
    **I think all said and done mine was in the crock for about 9 hours on low and it was perfect!**
(This was when I was just putting it in and stirring all the ingredients together)


Then as I said before I chose to serve this over rice cause that's what we had available in the pantry and then for the veggie part of the plate I decided on fresh green beans (cause quite frankly I LOVE green beans and could eat them every night) but have kind of gotten in a rut with just throwing them in the oven with some garlic, olive oil, some S&P and roasting them so I wanted to try something new that I made once before when I was in NY on vaca but haven't made here at home yet. So I gave it a whirl tonight to see what the Dear Hubby would think...and luckily he approved! :) 

Green Beans w/ Mushroom and Shallots
Ingredients
  • Fresh green beans, ends trimmed
  • 2 tsp olive oil
  • Button mushrooms, sliced
  • 1/2 a small shallot, sliced into thin rings
  • 2 cloves of garlic
  • Sea salt and freshly cracked pepper, to taste
Directions
Add the green beans to a pot of boiling water and cook for 3-4 minutes. 
Drain and rinse with cold water to stop the cooking and to retain the bright green color. Set aside.
Heat the olive oil in a skillet over medium heat. Add the mushrooms and let them cook (without stirring) for 3-4 minutes; stir and add the shallots to the skillet. 
Cook the shallots and mushrooms for 2 minutes before adding the minced garlic and green beans. Cook, stirring constantly, for 1 minute or until the green beans are nice and hot. Season with sea salt and pepper, to taste.
(YUMMY....these where very tasty!)

Then, of course you know me I had to take a picture of my final plate along with my (don't judge) Pillsbury Grand Buttermilk Biscuits from a can which I slathered in honey before eating! :) 
Quick, easy, delicious, and everyone was happy when dinner was finished and the best part is I have lunch for tomorrow that I am VERY excited about! WIn, WIn! 


That is all I got for you tonight. I hope you try this meal and if you do try it let me know what you think! I haven't decided if I am going to use the crock pot again tomorrow or if I am going to make that Shepards Pie finally. Either way I am sure to take some pictures and hopefully I can crank out another blog to you guys so you can see what I am cooking up! Good Night!! :) 

Thursday, August 16, 2012

Knock, Knock Anyone Still Out There??

Well, I know it been awhile but I have been dealing with some health issues that had me either not cooking at all OR I was cooking but not having the energy to document, then blog and heck even eat by the time I was finished! It was horrible but hopefully we got everything straightened out and I can get back to what I love, cooking for my hubby and sharing it all with YOU! :)  Now im not gonna promise to crank out recipes everyday but I think I can handle at least a couple a week.

So without further ado, I give you the recipe from last night which I got from my July/August 2012 Food Network Magazine. Let me just tell you we all thought the marinade on the kebobs was fantastic. Very easy with things you probably already have in your pantry! Unlike the recipe that tells you to just mix up the meat with the peppers in the marinade right before putting them on the skewer. I put them all in a ziploc bag first thing in the morning so it sat together all day. I also added onions to my kebobs just cause I like cooked onions! :)

I thought the Orzo was pretty good but tried ALL through dinner to explain to not only my husband but my brother-in-law and my brother that Orzo was in fact a PASTA and not a RICE they were eating. Ugh...boys! Other than the work of actually making the skewers the whole meal once that part is done takes only about 12 min to make start to finish so its not bad for those who want a nice meal but not a whole bunch of fuss when they get home form work (especially if you already chopped everything up before work and its been marinating all day...its good to go!)

Hope you try it and like it as much as we did!

Sizzling Sirloin Kabobs on a Bed of Orzo


Ingredients

  1. 1 pound beef top sirloin steak, cut 1 inch thick
  2. 2 green, red and/or yellow bell peppers, cut into 1 inch pieces
  3. 1 tablespoon chopped fresh basil or 1 teaspoon dried basil
  4. 1 tablespoon prepared Italian dressing
  5. 2 large cloves garlic, minced
  6. Salt and pepper
    Orzo:
  1. 1 cup uncooked orzo pasta, cooked according to package directions
  2. 2 to 3 tablespoons chopped fresh basil or parsley
  3. 2 tablespoons shredded Parmesan cheese
  4. 2 teaspoons olive oil

Instructions

  1. Soak eight 8-inch bamboo skewers in water 10 minutes; drain.
  2. Cut beef steak into 1-1/4-inch pieces. Toss beef and bell peppers with 1 tablespoon basil, dressing and garlic in large bowl. Alternately thread beef and peppers onto skewers.
  3. Toss Orzo ingredients in medium bowl; keep warm.
  4. Place kabobs on grid over medium, ash-covered coals. Grill, covered, about 8 to 10 minutes (over medium heat on preheated gas grill, 9 to 11 minutes) for medium rare (145°F) to medium (160°F) doneness, turning occasionally. Season with salt and pepper, as desired. Serve with orzo.
**The only things I changed (which trust me isn't anything drastic!) was I added an onion to the kabobs, marinated the steak and veggies all day PLUS I soaked the bamboo skewers way longer than they said cause 
my good friend Amanda told me the longer the better!


Also, I was hoping to get this in yesterday (8-15-2012) to wish the Amazingly talented Julia Child her would be 100th birthday!! I love her shows, I love her cooking and I love the way she goes about cooking in the kitchen where nothing is a mistake! My kinda gal....

Julia Child (8/15/1912-8/15/2012)
HAPPY 100th BIRTHDAY!! 

Thursday, May 3, 2012

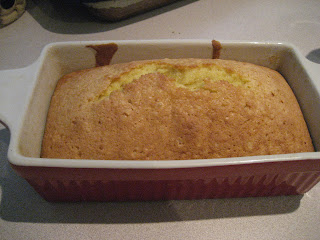
TWD: Baking with Julia - Lemon Loaf Cake

Man have I been slacking! I have missed my last two baking post that I am supposed to do for my Tuesdays with Dorie. I did bake one of the recipes WEEKS before I was due to blog about it and then was a complete airhead and didn't remember to post the picture and what I thought about the recipe! SO...even though its really late I thought what the heck I will blog about it anyway!


This Lemon Loaf cake is similar to a pound cake and can be completely made without any fancy stand mixers or any other kitchen gadget. Just you a whisk and a bowl! The cake was moist and delicious. Some other bloggers reported that they hardly tasted the lemon but I didn't think that at all. I think if I were to add more zest it would have been a little overpowering but that's just me. :)

A few other people added a nice glaze to the top of their loaves and I wish I would have thought of that because it looked AMAZING! Oh well...maybe next time!

The two hosts of this recipe are Truc of Treats and Michelle of The Beauty of Life. They both have the recipe posted on there blogs for you to check out as well. OR page 252 in the cookbook Baking with Julia! Enjoy!! :) 

Tuesday, March 6, 2012

TWD: Baking With Julia - Rugelach

So I am back with another Tuesdays With Dori recipe. This week it is Rugelach, before having to make this recipe I didn't even know what Rugelach was! For those of you who are like me and never even heard of Rugelach let me help you out...it is a Jewish cookie/pastry made with a cream cheese dough and filled with dried fruits and nuts. They are usually made in a crescent roll shape but for this recipe we rolled it jelly roll style and cut them into pin wheels.

The recipe for these cookies to me was a little difficult and takes A LOT of time. Expect to spend 2-3 days with this recipe if you want to make them. For me, the hardest part was rolling out the dough. For some reason I can not get a hang of it and im not quite sure what I am doing wrong! Whenever I have to roll out dough by the time I am done me and the kitchen is covered in flour and I am left with dough that looks very sad! LOL Oh well hopefully by the end of this challenge that will be something I can improve on and not be such a disaster in the kitchen with!! Oh yeah one more thing...I think when I cut the cookies into pin wheels I cut them to big (they were suppose to be cut 1 to 1 1/2 inches thick) because when they were cooking some of them tipped over. So IF I ever make this recipe again I will stick more to 1 inch. :)

I filled my Rugelach with Apricot lekvar (homemade btw!) dried cherries, raisins and assorted nuts. If you want the actually recipe for these cookies head on over to either one of this weeks host and check it out. First is Jessica at My Baking Heart and then we have Margaret over at The Urban Hiker.

The end result for me was a pile of cookies that to me didn't look very good but luckily everyone who tried them thought they were great so I suppose that is a good thing, right??


Monday, February 13, 2012

Yummy Spinach Dip!


So as everyone (well most normal people who aren't living under a rock) in North America probably knew...two weekends ago was the Super Bowl. I am VERY happy to announce due to my total dislike for anything New England Patriots (sorry Jen!) that the New York Giants rallied late in the game to pull off a 21-17 victory against New England in Super Bowl XLVI!! GO GIANTS!

I will admit that I am not a die hard Giants fan. Growing up in Southwest Florida my whole life I am a through thick and thin Miami Dolphins girl so much so that it is represented not only on the front but on the back of my car as well! With that being said, as much as I LOVE my fins...I dislike (I'm saying dislike because I am trying to be polite!) the Patriots just as much along with there QB Tom Brady. So I will pretty much route for whoever they are playing against! :)


Anyway, I get side tracked easily! So two weekends was the Super Bowl and we ended up going over to some good friends of ours house to watch the game and I decided to bring over Spinach Dip. Now this isn't my original Spinach Dip recipe that I have used for several years this is actually a dip that I started making after my cousin Kasey brought it over one time to a party that we were having at our house and it was so good (and I don't even like spinach!) that I had to have the recipe! People like me who don't even like spinach or spinach dip really like this dip that's how GOOD it is. Trust me!

The original recipe comes off the back of the Lipton Vegetable Soup mix box with one little alteration which I am positive is what makes this dip as fabulous as it is. First let me give you the recipe and then I will tell you what we do differently....

Spinach Dip

INGREDIENTS

  • envelope Lipton® Recipe Secrets® Vegetable Soup Mix
  • container (8 oz.) sour cream or 0% fat Greek yogurt
  • cup Hellmann's® or Best Foods® Real Mayonnaise
  • package (10 oz.) frozen chopped spinach, cooked, cooled and squeezed dry
  • can (8 oz.) water chestnuts, drained and chopped (optional)


DIRECTIONS

Combine all ingredients in medium bowl; chill 2 hours.
Serve with your favorite dippers.

Now as I stated before I do a few things different (not anything I came up on my own mind you but its still different.) I don't use the optional water chestnuts because I don't care for them but if you like them by all means give it a whirl! The one thing different I do and I believe Kasey found this out on accident because she bought the wrong ingredient one time but I could be mistaken about that, is we use frozen CREAMED spinach instead of just regular and it makes it a million times better in my opinion. It just adds this extra creaminess that is just simply heaven! Another thing is I don't cook my spinach. I'm not sure what Kasey does but I just never have since frozen spinach is already cooked anyway I just let it thaw out then add it. I don't even squeeze dry it because since you aren't cooking it it doesn't get all that extra liquid and I don't want to loose any of the yummy creamy part. 
I do usually double the recipe when I make it because a) it goes SO fast at parties you really want the extra dip and b) I usually place my dip in a bread bowl right before serving and after I have hollowed out the crust If I make just one batch of the dip it usually doesn't fill the whole bowl like I like it to! :) 
So there you have it. At your next get-together try this easy and inexpensive dip. I know you will love it as much as we all do! 
As always if you end up trying it let me know what you think! 
Have a good week!
Jen

Tuesday, February 7, 2012

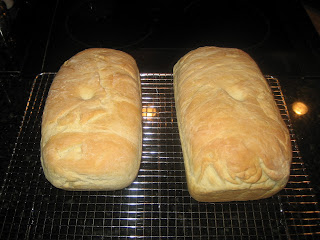
TWD: Baking With Julia - White Loaves!

Today kicks off the very first week of the new Tuesdays with Dorie blog group that I am apart of. As I said before in my previous post we will be baking recipes from the Baking with Julia cookbook by Dorie Greenspan. Our first recipe was for you guessed it...White Loaves of bread! This weeks challenge was hosted by Laurie and Jules, the creators of Tuesdays with Dorie, and you can find a copy of the recipe here on Jules' blog - Someone's in the Kitchen! Every Tuesday when a recipe is due to be posted there will be a different host with a link to his or her blog to get the recipe OR if you are feeling really adventurous you could buy the book HERE and join in the fun! :)

Now the whole reason why I entered in this blog group in the first place is because I was  am hoping it will make me a better baker. I have tried to make homemade bread once before (it was a Barefoot Contessa recipe for Honey White Bread) and while it wasn't a complete bomb it wasn't fabulous either. Especially the 2nd loaf that I froze!

I have read a few of the other blogs that were posted today on the TWD:BWJ blog to see how everyone else did on their loaves and I have to admit it makes me feel a little intimidated cause most of these people can really bake and where commenting on what a breeze this dough was to put together. I mean I didn't think it was hard but believe me when I tell you I had flour EVERYWHERE by the time those loaves went into the oven! LOL

I was also a little worried about my stand mixer. Its new to me I have only used it a couple of times and one step of the directions said to "beat and knead at medium speed for about ten minutes, until the dough is smooth and elastic." Well I read somewhere not to go over speed 2 when kneading and that you only have to knead the dough for like 5 minutes total or else you could burn up your motor. Does anybody know anything about this?? 


All in all I think it was a fairly successful recipe. I think next time I will definitely be trying a few of the suggestions to add a cinnamon swirl to one of the loaves that sounds delicious! Here is a picture of my White Loaves....  


Till next time TWD Fans....Happy Baking! :)

Friday, February 3, 2012

Four Cheese Pasta with Peas and Ham!

Before I get into the recipe for today I thought I would let you all in on a little secret of mine. I am a cookbook/magazine JUNKIE! There I said it and I feel a little better now that  its out in the open! LOL 

But seriously guys when I say I have a problem I am not joking around. I have cookbooks everywhere (one of the reasons I was trying to talk my hubby into getting me an ipad for xmas was so that I didn't have to have cookbooks everywhere because I could get digital ones!! ) and about a million and one magazine subscriptions. I can't help it I am a sucker for a good cookbook and magazine! 

Anyway, todays recipe is one we actually had last week for dinner and I got it out of I believe December's Food Network Magazine. I love FN Magazine but I rarely ever make any of the recipes cause they usually contain ingredients that the guy with the killer dimples (my hubby!) doesn't like. If it was up to Danny we would have spaghetti every night and that would be ok with him. Me I need variety I can't eat the same thing ALL the time! 

So here you go:

 Four Cheese Pasta with Peas & Ham

Ingredients

  • Kosher salt
  • 12 ounces penne
  • 1 cup frozen peas
  • 2 large eggs, plus 1 egg white
  • 1 cup evaporated milk
  • 4 tablespoons unsalted butter
  • 3 ounces sharp cheddar cheese, grated (1 scant cup)
  • 3 ounces part-skim mozzarella cheese, grated (about 1 cup)
  • 3 ounces fontina cheese, grated (1 scant cup)
  • 3 ounces deli ham, in 1 piece, diced
  • 1 ounce parmesan cheese, grated (about 1/2 cup)


Directions

Bring a large pot of salted water to a boil. Add the pasta and cook until very al dente, about 8 minutes, adding the peas in the last 2 minutes of cooking.
Meanwhile, whisk the eggs, egg white, evaporated milk and 1/2 teaspoon salt in a bowl.
Drain the pasta and peas; wipe the pot dry and return the pasta and peas to the pot. Add the butter and stir to coat. Add the cheddar, mozzarella, fontina and the egg mixture. Place the pot over medium-low heat and cook, stirring constantly, until thickened, 8 to 10 minutes, adding the ham halfway through cooking (don't let the mixture boil or the eggs will scramble). Remove the pot from the heat and stir in the parmesan.


**This dish was very tasty and we will probably have it again sometime in the future but next time I think I will boil the pasta a little longer. Your not supposed to cook it all the way because it continues to cook in the pan with the cheese and everything else but that did NOT happen with ours. So while the flavoring was good, it would have helped if the noodles were cooked all the way!

Well that's all I got for today! TGIF ya'll and HAPPY 30th BIRTHDAY to ME!! Can't wait to go out tonight with all our friends!!

Have a GREAT weekend!
Jen
XoxoX